
This is the second post in a series of tutorials about learning how to code. Check out other articles from the series here.
Now that we've gone through the introductions, you are familiar with the different editions of Minecraft and why we will be writing plugins for the Java edition. The next step is to get your computer set up to write these plugins!
Software developers write code in an IDE, which stands for Integrated Development Environment. Essentially, it's a fancy name for a text editor that understands programming languages and can help you by pointing out errors. There are many IDEs out there - IntelliJ, Eclipse, NetBeans. Every developer thinks the IDE they use is the best, and they're all right. The best IDE for you is one you feel comfortable using and that gets the job done.
For this tutorial however, I will demonstrate using IntelliJ, which is my preferred IDE. You're welcome to try out other IDEs as well! At the end of the day, they all let you write Java programs.
You can download IntelliJ from the JetBrains website here. There's a Community edition and an Ultimate edition. We won't need anything offered in the Ultimate edition, so you can go with the Community edition. (Ultimate also costs $149 for an individual license... so we can skip that!)
Once you download it from the website...
If you're on Windows 10/11: Launch the .exe file you downloaded, and you'll be walked through the setup program. All of the default install options are okay, so you don't need to change them. Once the installer has finished, you should be able to launch IntelliJ from a desktop/taskbar shortcut, or by searching in the Start menu.
If you're on macOS: Open the .dmg file you downloaded, and drag the IntelliJ IDEA CE application into the Applications folder. Once that's done, you can close out of that window, and you should be able to launch IntelliJ from Spotlight Search (⌘+Space), Launchpad (it should be in your dock), or Finder (the happy face program).
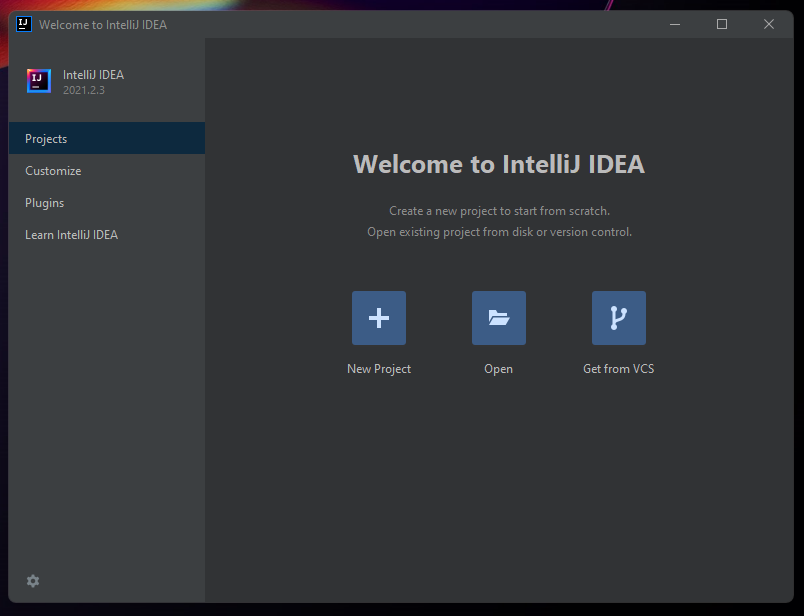
After launching IntelliJ, go through the initial setup screens. Read through the User Agreement and opt in/out of anonymous data sharing. Then, you should arrive at a screen that looks like this:
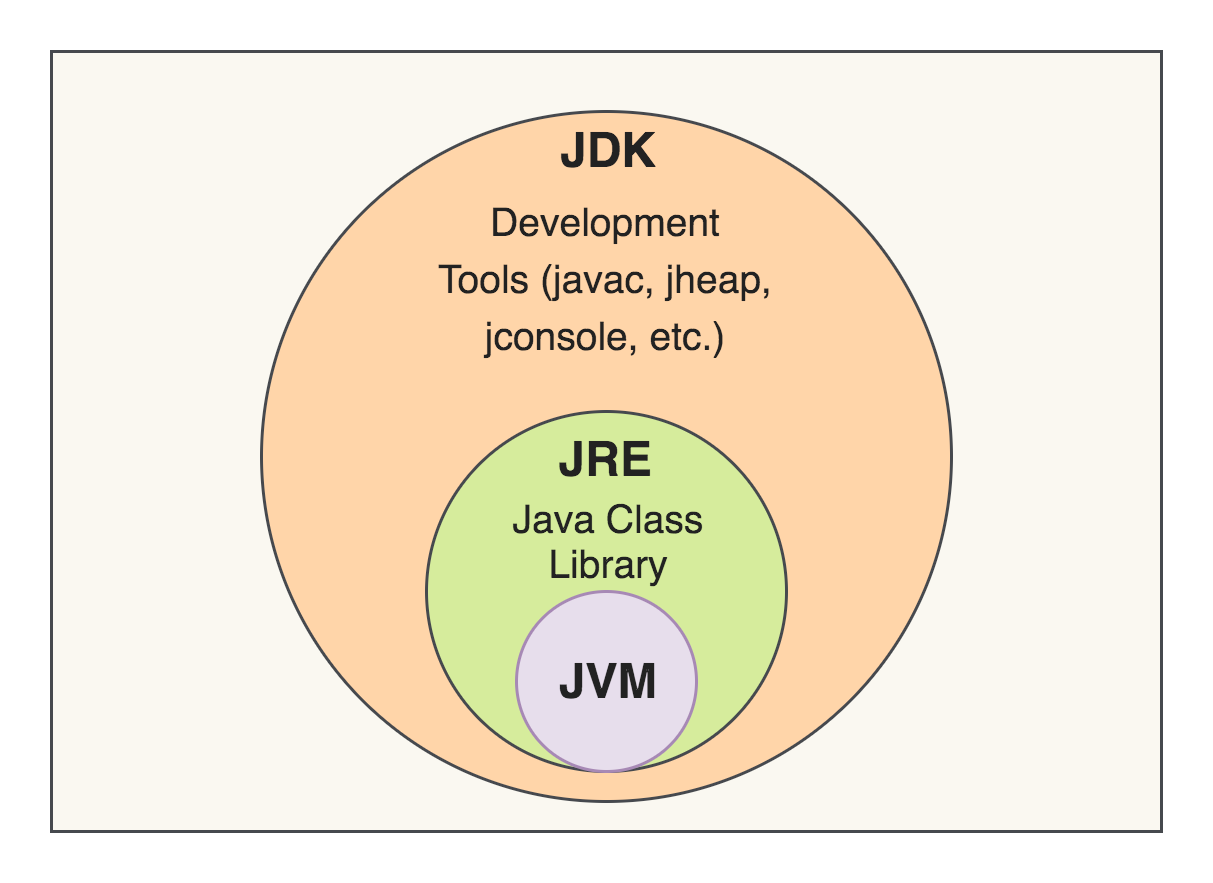
There's one last thing you have to install before you can start creating projects: a JDK (Java Development Kit).
Java programs, which are stored as JAR files, run on your computer inside a "virtual machine" called the JVM (Java Virtual Machine). Think of it like a mini-computer that runs in your computer.
Programs like Google Chrome and IntelliJ have different versions available for download based on the operating system they're meant to run on. For example, when you visit the IntelliJ download page, there are different tabs for Windows, macOS, and Linux. Normally, the same program can't run on different operating systems.
Unlike other types of programs, the same Java program can run on different operating systems. This is because of the JVM - it makes sure your single JAR will run the same on Windows, or macOS, or Linux.
How does this all relate to the JDK, though? Well, there are (unfortunately) more acronyms to learn.
In order to run a Java program (such as a JAR file), you need the Java Runtime Environment (JRE). The JRE includes core Java classes as well as the JVM, which actually runs the code. When you run Minecraft: Java Edition, for example, that program is running in a JRE.
The JRE is only able to run Java programs. We need to go a step further and write our own programs. To do that, we need the Java Development Kit (JDK). The JDK is the same as the JRE, except it also includes programs that know how to convert the Java code files we write into executable JAR files.
If all this seems confusing... you're right. This diagram might help clear things up a bit:
All that explanation to say... let's install a JDK! We'll be downloading our JDK from Adoptium. This is an open source project that builds and distributes versions of Java for free.
(If you aren't interested in the different distributions of Java and how their licenses differ, you can skip to the next section.)
Oracle, the organization that created and maintains Java, makes the source code of Java available for people to download. However, this source code must be compiled into something that your computer can actually run. Anyone could do this, but it's easier and faster to download pre-built versions of a program. Oracle does provide these pre-built versions of Java. However, the licensing they use requires a paid subscription for commercial purposes. This can be tough to understand without knowing how large businesses operate. They are often hesitant to use a "product" like Java without "support", as outlined by Oracle here, with business-y phrases like "How to protect your investment in Java SE". This doesn't mean much to you and I as individual developers.
Adoptium, on the other hand, simplifies this process by simply providing builds of Java from the same code Oracle produces. The only (significant) difference between Oracle's builds and Adoptium's builds is the licensing. Adoptium does not guarantee the support that Oracle's subscription does. As such, large organizations that need support for business purposes typically use Oracle's builds, whereas anyone that doesn't need that support (such as you and I) use Adoptium.
The previous two paragraphs do simplify some aspects of the licensing for these software products. Oracle's JDK licensing is complex enough that they made an FAQ for it. The tl;dr version is as follows: You, a new programmer, could download a JDK from Oracle, though you'll need to make a free account and agree to their terms and conditions. You could also download a JDK from Adoptium with no account required.
With all of that... fun... licensing stuff out of the way, let's actually download the JDK. Visit this website: https://adoptium.net/.
Like many pieces of software, there are multiple versions of Java to download and use. There are usually several new versions of Java released every year to continue its development. However, most versions stop receiving security updates once a new version is released.
There are, however, specific versions that are guaranteed long-term support, or LTS. These are the most widely used versions of Java, since security updates are guaranteed for a longer period of time. Recent examples of this are Java 11 and Java 17. See this Wikipedia article for the full Java version history.
On the Adoptium page, download the latest LTS version of Java. At the time of writing, that would be Temurin 11 (LTS).
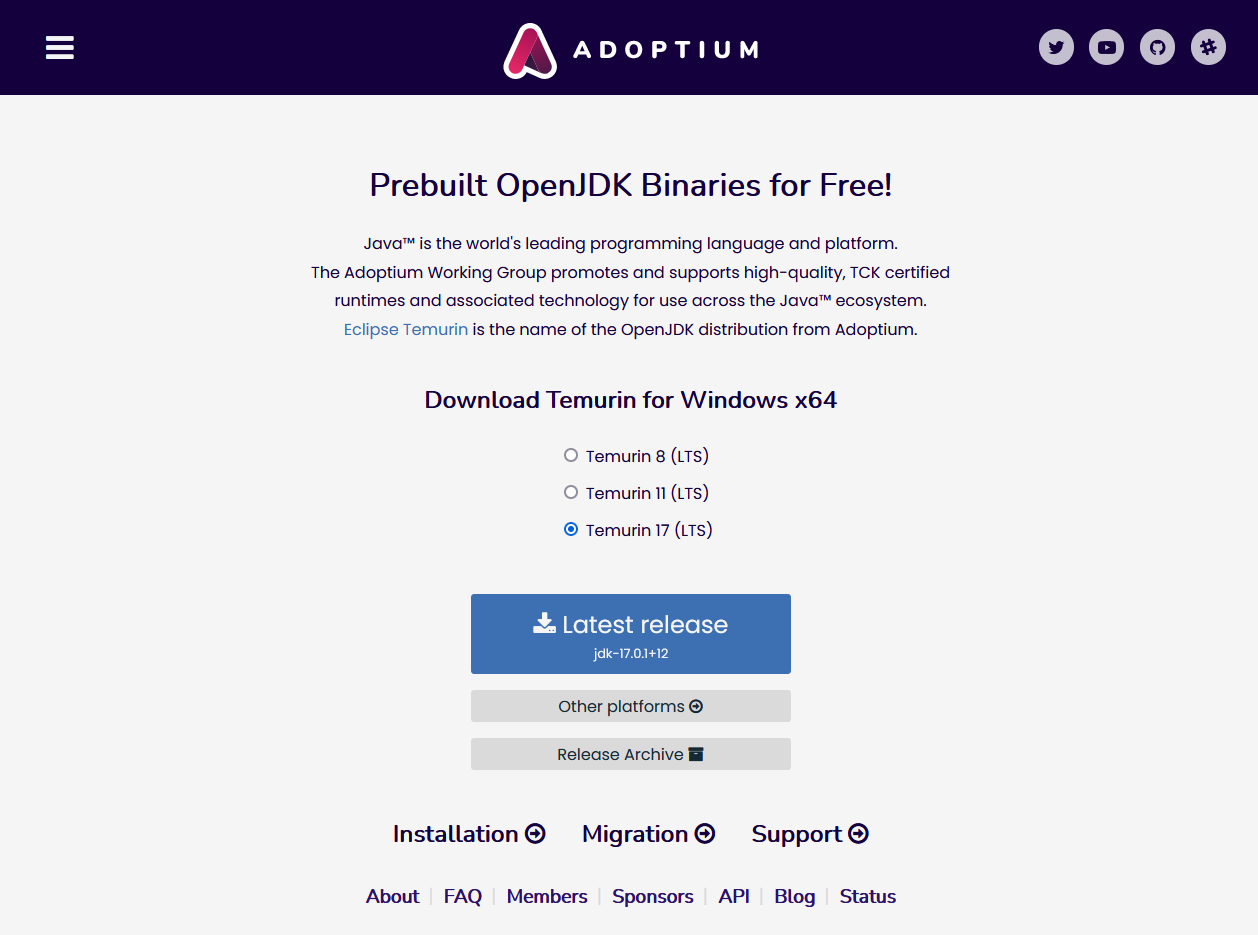
Click the "Latest release" button to download the JDK. For Windows, it will download a .msi file. For macOS, it will download a .pkg file.
Run the installer like you would for any other program. You can use all of the default options if you're given the option. You now have a JDK installed!
The very last thing you have to do here is configure your IDE to use the JDK you just installed. From the main screen in IntelliJ, click on "New Project". Towards the top of the screen, you'll see a "Project SDK" field with "<No SDK>" selected.

Select the "<No SDK>" drop-down. IntelliJ should automatically detect the JDK you installed:

If not, you can manually select it by clicking "Add JDK...", navigating to it directly, and clicking "OK":

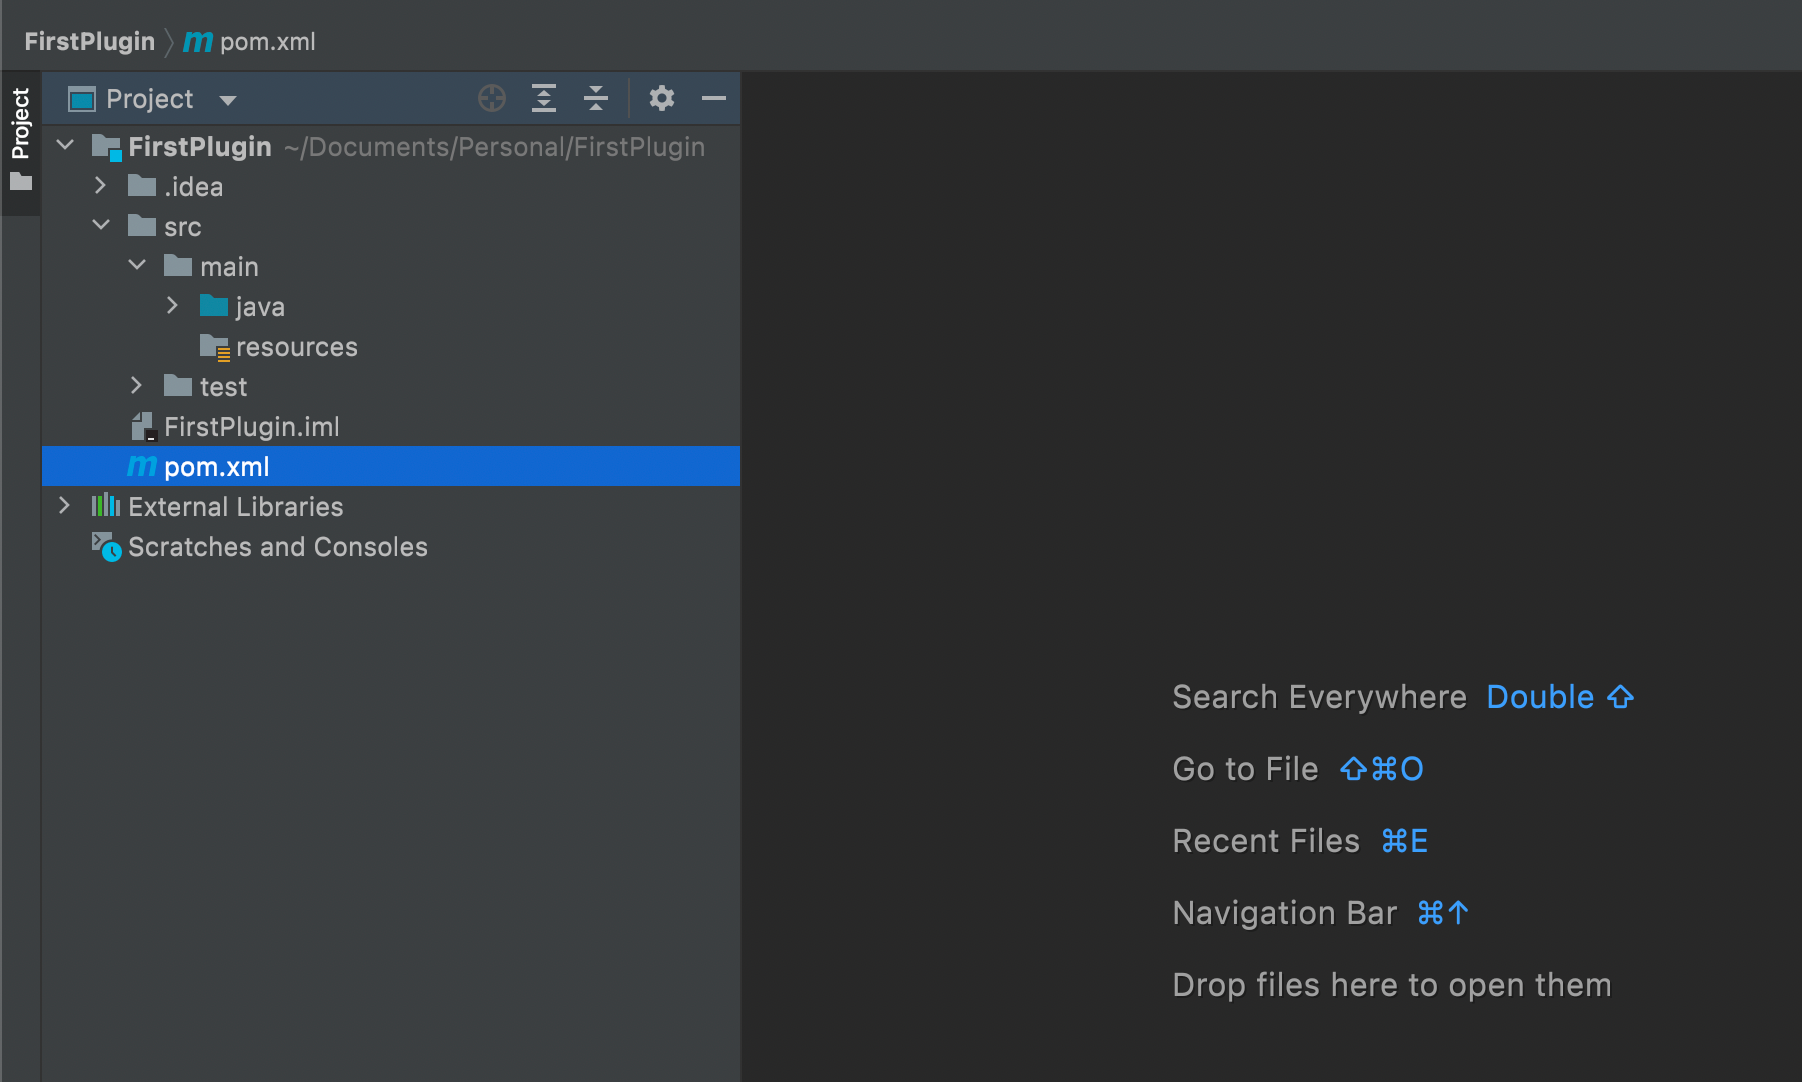
With that JDK selected, let's finish making a new project. We won't start writing code until the next tutorial, but we can get the project prepared now. Select "Maven" on the left sidebar, and click "Next" at the bottom of the screen:

Next, give your project a name and choose where to save it. Also, expand the "Artifact Coordinates" menu and enter values for "GroupId", "ArtifactId", and "Version":

GroupId, ArtifactId, and Version are used by Maven to identify libraries that are shared with other developers. We won't be sharing our projects like that in this case (unless you want to!), but we can still set these values however we want.
GroupId typically follows the backwards format of a website name. In my case, that's com.marcdif (the reverse of marcdif.com). Note: This does not need to be a real website!
ArtifactId is the actual "name" of your project, or "artifact". In my case, that's "FirstPlugin".
Version is generally written in the format of "1.2.3-SNAPSHOT", though there are many different opinions on how to write versioning. Semantic versioning (1.2.3), calendar versioning (2021.11.06), and more. Whichever you choose is up to you.
When you're ready, click "Finish" to finish making the project.
There is one last (optional) step to prepare your IntelliJ IDE for use. After clicking "Finish" above, you should see a window like this:

We can immediately do two things to improve your IDE experience.
First, you can choose to hide the "Tip of the Day" window. If you want to read them, that's great! If not, they can get a little annoying. Check "Don't show tips" and click "Close":

Lastly, that "Download pre-built shared indexes" bubble that showed up in the bottom-right corner has probably disappeared into the "Event log". Click "Event log" to see the full message:

To run faster and operate more efficiently, IntelliJ will create indexes for libraries of code you use in your project (like your JDK). However, building these indexes for the first time can be time consuming, depending on your computer's capabilities. You can choose to download indexes that have already been built by IntelliJ for common libraries (like your JDK).
If you choose "Always download", as you might guess, it will always download indexes when there's a need. If you choose "Download once", it will download them for this project, and prompt you again in the future. If you choose "Don't show again", your computer will automatically build indexes locally. Which option you choose is up to you.
This wraps up the second part of this Minecraft plugin tutorial! You now have an IDE set up on your computer, and you have a JDK configured. Next time, we'll start writing some Java code!
Part 1 - Introduction
Part 2 - Setting up your IDE and JDK
Part 3 - Writing some Java code
Part 4 - Testing Your Plugin
Part 5 - Coming soon!